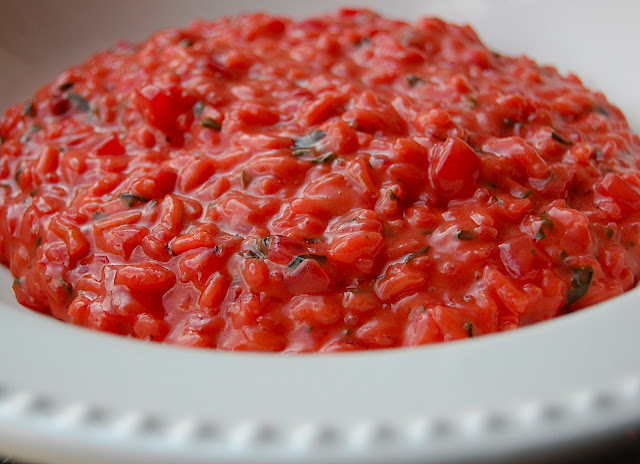
Thursday, July 31, 2008

Zucchini, Bean, and Cheese Burritos

Inspiration:
The Saint Paul Farmers' Market Cookbook
as well as zucchini and summer squash from our CSA


Ingredients:
  • 2 6-inch zucchini
  • 4 wheat tortillas
  • 1 cup seasoned refried beans
  • 1 cup cheddar cheese, grated
  • 1 cup salsa

Instructions:
  1. Preheat oven to 450 degrees. Trim the stems of zucchini and cut each one in half lengthwise. Steam zucchini halves, cut side down, until tender, about 6 minutes. They may also be microwaved in a covered dish, with 2 tbsp. water, until tender, about 3 minutes. On each tortilla spread 1/4 cup beans. Place a zucchini half, cut side up, on top of beans. Sprinkle with 1/4 cup cheese and fold up. Place burritos seam side down in a greased baking dish. Top with salsa and more cheese. Bake for 15-20 minutes until cheese is bubbly.

Recipe Notes:
"The zucchini inside these will surprise them!"

My Notes:
This was an ok vegetarian recipe. I think it could be improved to a very good vegetarian recipe with a few modifications. I would sauté onions with jalapeño and either taco seasoning or cumin and add it to the burritos. It just needed a bit more zip. I would also use some Monterey jack along with the cheddar cheese.

Tim's Rating: 7.5/10
Liz's Rating: 7.5/10

Egyptian Cucumber Cheese Salad

Inspiration:
Mary Broeker's recipe in the Saint Paul Farmers' Market Cookbook
as well as a cucumber from our CSA

Ingredients:
  • 1 large cucumber, peeled and halved lengthwise, seeds removed
    (see note below before making this)
  • Salt
  • 12 oz. feta cheese, drained if necessary
  • 1/2 cup mild onion, finely chopped
  • 1/4 cup lemon juice
  • 1/4 cup olive oil
  • freshly ground black pepper
  • mint sprigs for garnish

Instructions:
  1. Score cucumber with a fork. Sprinkle with salt and let stand for 20 minutes.
  2. Crush cheese with fingertips or fork and mix thoroughly with onion, lemon juice, and oil. Season with pepper.
  3. Drain, rinse, and slice cucumber about 1/3-inch thick. Combine with cheese mixture.
  4. Place in a shallow serving dish and decorate with mint sprigs. Chill about 30 minutes before serving.

My Notes:
I loved all of the flavors in this recipe. Unfortunately, the proportions were WAY off. There was not enough cucumber... there must be a typo in the recipe. I was on recipe auto-pilot and didn't notice the overabundance of cheese mixture until it was too late. I think 4-6 cucumbers would be better. I found this recipe online, which is quite similar. It uses 8 oz. feta to two cucumbers. I will try working with the proportions next time and make this again; it was quite tasty. (Oh and next time I may peel the cucumber as suggested; I missed that part of the recipe the first time around.)

Liz's Rating: 9.5/10 (for potential); 6/10 (actual recipe)

Wednesday, July 30, 2008

Martha's Spiced-Yogurt Marinade

Inspiration:
Martha Stewart

Ingredients:
  • 1 cup plain yogurt
  • 3 tablespoons fresh lemon juice
  • 3 tablespoons extra-virgin olive oil
  • 1 small onion, chopped (1/2 cup)
  • 1/4 cup packed fresh mint
  • 4 garlic cloves, chopped
  • 2 strips lemon zest (each 2 inches long)
  • 1/2 teaspoon ground cumin
  • 1/2 teaspoon hot paprika
  • 1/2 teaspoon ground coriander
  • 1/4 teaspoon ground cinnamon
  • 1/4 teaspoon ground ginger
  • bone-in chicken pieces

Instructions:
  1. Place all of the ingredients in a blender, and puree until smooth. Use immediately, spreading the mixture on the chicken skin.
  2. Marinate the chicken overnight, and then roast, still coated with the marinade, in a 375-degree oven.

Recipe Notes:
A twist on the traditional tandoori marinade, this cumin- and coriander-flecked yogurt paste remains on the chicken during roasting, ensuring that the skin crisps, while keeping the underlying meat moist and silken. The resulting depth of flavor belies the recipe's everyday ingredients. Makes enough for 5 to 6 pounds chicken. This marinade works best with a whole chicken cut into pieces or bone-in, skin-on pieces.


My Notes:
I was a little concerned that this would be too similar to last night's dinner of Indian-Spiced Chicken Burgers, but it wasn't. The yogurt marinade made this the juiciest chicken we've ever tasted, which is saying a lot since this was a free-range vegetarian-fed chicken (which are sometimes less juicy). I loved the marinade. I will be making this again.


Liz's Rating: 8/10
Tim's Rating: 8.5/10

Wonderful Green Beans

Inspiration:
Xelma Q. Pitzl's recipe in the Saint Paul Farmers' Market Cookbook
as well as green beans from our CSA

Ingredients:
  • 1 lb. fresh green beans (about 3 cups of 1-inch cuts)
  • 1 tablespoon olive oil
  • 1/2 small onion, chopped
  • 1 clove garlic, minced
  • 1/4 teaspoon ground cumin
  • 1/8 teaspoon ground coriander
  • salt and black pepper to taste
  • chopped almonds if desired

Instructions:
  1. Trim ends of green beans and cut into bite-sized pieces approximately 1-inch long. Cook the beans in a small amount of water until tender; about 15 to 20 minutes. Drain and set aside.
  2. Place oil in saucepan and and heat on medium-low heat. Add onions and garlic and sauté until onion is tender. Add cumin and coriander and mix well. Add the green beans and stir. Salt and pepper to taste. Chopped almonds can be added if desired but dish is equally as good without.

Recipe Notes:
Makes 3-4 Servings.
"The seasonings make the green beans sensational. They are so flavorful that people who hate green beans love them when prepared this way."


My Notes:
Well Xelma Q. Pitzl created a good recipe! I am not a huge fan of green beans; I think this is one of my favorite preparations. Tim loves green beans and ate these up.


Tim's Rating: 8/10
Liz's Rating: 8/10

Tuesday, July 29, 2008

Indian-Spiced Chicken Burgers

Inspiration:
Adapted from Everyday Food: Great Food Fast

Ingredients:
  • 1.5 pounds ground chicken
  • 3 scallions, thinly sliced
  • 3 tablespoons of minced fresh ginger
  • 2 tablespoons fresh lemon juice
  • 1 tablespoon paprika
  • 2 teaspoons ground cumin
  • 1/4 teaspoon cayenne pepper
  • Coarse salt
  • fresh ground pepper
  • 6-8 pieces of naan (or 4 whole wheat pitas)
  • 1 cucumber, halved lengthwise and sliced on the diagonal (optional)
  • fresh cilantro
Cumin Yogurt Sauce
  • 1/2 cup plain yogurt
  • 1/2 teaspoon ground cumin
  • coarse salt and ground pepper

Instructions:
  1. In a medium bowl, combine the chicken, scallions, ginger, lemon juice, paprika, cumin, and cayenne. Add salt and pepper to taste; mix well. Set aside for at least 10 or up to 30 minutes.
  2. Meanwhile, combine ingredients for cumin-yogurt sauce.
  3. Make 6-8 patties, and grill or fry for 2-3 minutes per side or until done.
  4. Put two pieces of naan on each plate. Place one patty on each, as well as cucumber (if used), a few sprigs of cilantro and the cumin-yogurt sauce and serve.
Tim's Rating: 9/10
Liz's Rating: 9.5/10

Naan

Inspiration:
Adapted from allrecipes.com

Ingredients:
  • 2/3 cup warm water (110 degrees F/45 degrees C)
  • 1 teaspoon active dry yeast
  • 1 teaspoon white sugar
  • 2 cups all-purpose flour
  • 1 teaspoon salt
  • 1/4 cup ghee or oil
  • 2 tablespoons plain yogurt

Instructions:
  1. Whisk the warm water with the yeast and sugar until the yeast is dissolved. Cover and let stand in a warm place for 10 minutes.
  2. Sift flour and salt three times into a large bowl add the yeast mixture, half of the ghee or oil and all the yogurt. Mix into a soft dough then knead on a floured surface for about 5 minutes or until dough is smooth and elastic. Place the dough in a large greased bowl, cover and let stand in a warm place for 1 1/2 hours or until the dough is doubled in size .
  3. Punch down dough then knead for 5 minutes. Divide dough into 6 pieces. Let rise for an additional 10-30 minutes if you have the time. Roll each piece out into 8 inch round naans.
  4. Brush the naan with a little of the remaining ghee or oil. Heat oil in a large flat skillet. Pan fry naan one at a time for about 2 minutes on each side or until puffed and just browned, adding additional oil as necessary.

Recipe Notes:
"This is an authentic Indian Naan recipe. I have made this many times. It goes well with Indian curry which has a lot of gravy, such as the Butter Chicken." (Original recipe uses ghee instead of oil.)

My Notes:
This is my best yeast-bread result so far. I have to say I am pretty impressed with myself- this naan tastes exactly like that of our favorite Indian/Nepali restaurant, Everest on Grand.

Tim's Rating: 10/10
Liz's Rating: 10/10

Sunday, July 27, 2008

Spicy Cashew Salad with Chilies, Cilantro, and Lime

Inspiration:
Quick & Easy Thai
as well as green onions from our CSA

Ingredients:
  • 1 cup fresh raw whole cashews (about 1/4 pound)
  • 1/2 teaspoon salt
  • 3 tablespoons coarsely chopped shallots
  • 3 tablespoons thinly sliced green onions
  • 2 teaspoons dried red chili flakes
  • 2 tablespoons freshly squeezed lime juice
Instructions:
  1. Line a plate with a double layer of paper towels, and place it by the stove, along with a slotted spoon or an Asian-style wire-mesh strainer. Heat 2 or 3 inches of vegetable oil in a medium skillet or wok over medium heat until a raw cashew begins to sizzle a few seconds after you add it to the oil, 4 to 5 minutes. Keep one raw cashew handy by the stove to help you judge the changes in color as the nuts cook.
  2. Gently add cashews and cook, stirring gently and often, until the nuts turn a soft, pale golden brown, 2 to 3 minutes. Scoop the cashews out onto the prepared plate, using a slotted spoon or a wire-mesh strainer. Let them drain and cool a little while you set out a medium bowl and a small serving platter.
  3. Turn the still-warm cashews into the bowl and toss with salt. Add the shallots, green onions, and chili flakes and toss well. Just before serving, add the lime juice, toss well, and mound on the serving platter. Serve warm or at room temperature, with small spoons for eating, or as finger food.

Recipe Notes:
"You may think that cashews are nearly perfect already, but try this simple preparation and you will agree with me that sometimes a good thing can get even better. Raw cashews are widely available in Asian markets at a reasonable price, and they keep a long time uncooked. You can add a big spoonful of dried shrimp, if you like them, and offer a plate of small lettuce cups so your guests can scoop up these delectable cashews bite by bite."


My Notes:
First, the obvious: except for the title, cilantro is nowhere to be seen in this recipe! I am not sure how that happened. Cilantro would be a good addition to this dish, approximately 3 tablespoons of chopped leaves. Otherwise, I would leave this recipe as-is; it's very good.


Tim's Rating: 9/10
Liz's Rating: 9.5/10

Country-Style Curry with Ground Beef and Green Beans

Inspiration:
Quick & Easy Thai
as well as zucchini and green beans from our CSA and ground beef from a local farmer

Ingredients:
  • 2 tablespoons vegetable oil
  • 1 tablespoon coarsely chopped garlic
  • 2 tablespoons red curry paste
  • 1/2 pound ground beef or ground pork
  • 1 cup sliced fresh mushrooms
  • 3 cups chicken broth or water
  • a handful of green beans, cut into 1-inch lengths (about 1 cup)
  • 2 medium zucchini or 2 long Asian eggplants, halved lengthwise and cut into 1-inch lengths (about 2 cups)
  • 4 wild lime leaves, torn or cut into quarters (optional)
  • 3 tablespoons fish sauce
  • 1 tablespoon sugar
  • 1/2 teaspoon salt
  • a handful of holy basil (bai graprao), or other fresh basil leaves or cilantro leaves
  • cooked rice, for serving

Instructions:
  1. Heat the oil in a large skillet over medium heat, add the garlic and toss well. Add the curry paste and cook, mashing and stirring to dissolve it until fragrant and softened, 2 to 3 minutes.
  2. Crumble in the ground beef and then add the mushrooms. Cook, tossing often, until the meat and mushrooms are browned and seasoned with the curry paste, 2 to 3 minutes.
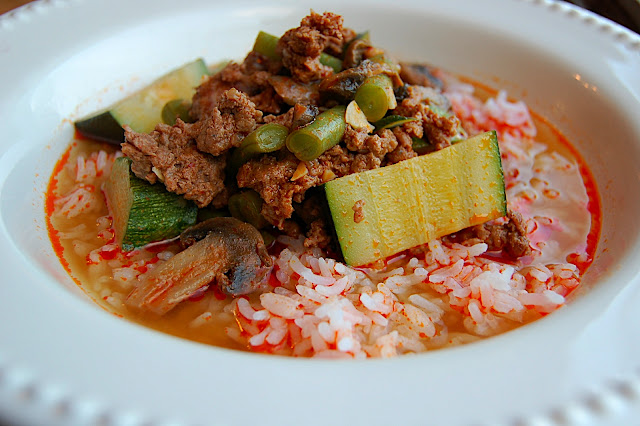
  3. Add the chicken broth, green beans, zucchini, lime leaves (if using), fish sauce, sugar, and salt and bring to a gentle boil. Cook 3 to 5 minutes, until the vegetables are tender and the meat is cooked. Stir in the basil leaves and remove from heat. Transfer to a serving dish and serve hot or warm.

Recipe Notes:
Serves 4 to 6
Thai name: gaeng bah neua sahp

"This firecracker version of vegetable-beef soup uses red curry paste, simmered in broth rather than coconut milk. The word bah means "forest," evoking the soup's origins, where hunters of old made curry over an open fire, without the luxurious addition of coconut milk.

Bamboo shoots, eggplant, and baby corn would make tasty additions in this hearty dish, an upcountry favorite yielding intense and fiery flavors in a flash. You could also make it with thinly sliced beef or pork, or with chicken cut in big, bite-sized chunks. Serve this curry with lots of rice and a plate of coarsely chopped tomatoes, cucumber slices, and halved hard-boiled eggs. Pair it with new potatoes tossed with butter and a hunk of crusty bread for a volcanic but delicious supper on a winter night."


My Notes:
This was an ok recipe. I think the amount of broth is a bit much; start with half the broth and then add the rest to your liking. I was happy with how many vegetables were incorporated into the curry. I think that we prefer green or yellow curry to red. Like I said, it was ok.


Tim's Rating: 8/10
Liz's Rating: 7.5/10

Product Rave: Frontera Habanero Lime Salsa

In an ideal world, I'd be able to make all of my own salsa. In reality, I don't.

This salsa
from the Rick Bayless empire is delicious! Very spicy! I found it at my local coop for <$2; you can't beat the price.

"Created by celebrity chef Rick Bayless. Habanero is flavor's fireworks. Lime makes the spectacle more vivid. Roasted tomatoes and a touch of sweet mango provide the perfect background for the extravaganza. What are you waiting for? There's just a lid between you and the party!"

Friday, July 25, 2008

Curtido

Inspiration:
Cabbage from our CSA and the curtido we enjoyed along with pupusas at the local restaurant Mañana. Our restaurant visit was inspired by WeezerMonkey's post on her pupusa outing in LA. Oh, and this recipe!

Ingredients:
  • 1 medium head of cabbage, chopped
  • 2 small carrots, grated
  • 1 small onion, sliced
  • 1/2 teaspoon cayenne pepper or paprika
  • 1/2 teaspoon oregano
  • 1 teaspoon olive oil
  • 1 teaspoon salt
  • 1 teaspoon brown sugar
  • 1/4 cup vinegar
  • 1/2 cup water

Instructions:
  1. Place the cabbage in boiling water for no more than one minute. Discard the water.
  2. Put the cabbage in a large bowl and add grated carrots, sliced onion, cayenne, oregano, olive oil, salt, brown sugar, vinegar, and water.
  3. Let chill in refrigerator at least two hours before serving.

Notes:
Obviously we left out the carrots and onion. It still tasted great, but would have photographed better if I had included carrot! We served this with Mexican food; it would work well with any sort of Mexican or other Latin food.

Tim's Rating: 9/10
Liz's Rating: 9/10

Wednesday, July 23, 2008

Disappearing Zucchini Orzo

Inspiration:
Zucchini and summer squash from our CSA and a recipe from the book Animal, Vegetable, Miracle by Barbara Kingsolver. Thanks to Helen and Lindsay for the book recommendation! If you haven't read this book, go directly to the bookstore and pick it up. (Don't wait until winter to read it; I am so glad I am reading it during CSA/Farmers Market season.) Don't borrow it from the library, because it's one of those books you should keep on your shelf.
Recipe PDF


Ingredients:
  • ¾ lb pkg orzo pasta (multicolored is fun)
  • 1 chopped onion, garlic to taste
  • 3 large zucchini
  • olive oil for sauté
  • thyme, oregano, or dill
  • ¼ cup grated parmesan or any hard yellow cheese

Instructions
  1. Bring 6 cups water or chicken stock to a boil and add pasta.
  2. Cook 8 to 12 minutes.
  3. Use a cheese grater or mandoline to shred zucchini, sauté briefly with chopped onion and garlic until lightly golden.
  4. Add spices to zucchini mixture, stir thoroughly, and then remove mixture from heat.
  5. Combine with cheese and cooked orzo, salt to taste, serve cool or at room temperature.

Notes:
It's true the zucchini "disappears" in this recipe. You can't really taste it. However, this doesn't taste really like anything until the herbs, cheese, and salt and pepper are added at the end! I used one small and one medium clove of garlic; next time I will add much more garlic and herbs. This is a great way to use up zucchini! It's also a nice base recipe; you could add many other vegetables (spinach, tomatoes) to this base.


Liz's Rating: 8/10

Tuesday, July 22, 2008

Wisconsin-Style Bratwurst

Inspiration:
A love for bratwurst due to our Wisconsin upbringing.

Ingredients:
  • fresh bratwurst
    (not pre-cooked; preferably from a local butcher)
  • hard rolls
  • spicy mustard
    (my favorite is Beer'n Brat Mustard)
  • 24 ounces beer
    (preferably Miller, since these are Wisconsin-style brats, but really any beer but Budweiser!)
  • large sweet onion, halved and sliced into 1/4 inch thick slices
  • sauerkraut
    (preferably bagged or Frank's Kraut)

Instructions:
  1. Prepare coals in a charcoal grill.
  2. Meanwhile, in a large pot on medium-low heat, simmer/boil brats and onion in beer (add water to cover if necessary) until brats are cooked through.
  3. Continue to boil onions in beer after removing the brats.
  4. Grill brats until nicely browned.
  5. Serve in hard rolls with mustard, onions, and sauerkraut.

Notes:
In a discussion on a cooking board I frequent, we shared different bratwurst preparation styles. Some people, like me, prefer to boil the brats in beer and onion prior to grilling. Other people swear by grilling the raw brats first, then soaking in beer and onions before serving, because it soaks up more beer flavor that way. Finally, some people add green pepper to the beer-onion mixture. In my opinion, green peppers do NOT belong with bratwurst! Italian sausages, maybe, but not bratwurst.

I hope you enjoy our method.

Tips for Taking Food Photos

One of my readers (insomniac) suggested a post on how to take photos of food.

I am no expert, but here are my thoughts:
  1. You need natural light. This is the most important element of a good photo. Lots of natural light. It's very obvious to me which blog photos have been taken in natural light and which have been taken with incandescent light or flash photography. I don't know how our Minnesota winters will affect my blog photos, but I am not looking forward to days with only ~7 hours of natural light!

  2. Use good dishes and a good background. I love my dishes and am glad that they're white. When I registered for them five years ago, I wasn't planning on using them for a cooking blog, but it's worked out well. Plain dishes are better than patterned or brightly-colored dishes for most photo purposes. Backgrounds also matter. Remove anything distracting from the background.

  3. You need a good camera. You don't need a dSLR, but in my experience it's much easier to take a good photo with a dSLR than with a point-and-shoot. However, other bloggers (like WeezerMonkey) can take excellent photos with point-and-shoot or even iphone cameras.

    I shoot blog photos with a Nikon D40, a gift from my Mom and Dad (oops, I mean Santa!). I just use the 18-55mm kit lens, which is actually a pretty nice lens. I also have a 55-200mm VR lens and a macro lens, but for most purposes the kit lens works best. I rarely use flash.

  4. Take a lot of photos. I usually take 10-30 photos of each dish and am happy with 1-2 of them. It doesn't take long to delete photos you don't like (less than one minute).

    Try all different angles. The food can look very different depending on which part of it is facing you. For example, take a photo of a slice of pizza with the crust facing you, one at 45 degrees, one at 90 degrees, one at 135 degrees, and one with the crust away from you.

    Try photographing from the top of the food item. Get down low and take a photo with the food at eye-level. Pay attention to which part of the plate is hit by your (preferably natural) light. Remember, it's digital photography! You can delete any photos you don't like!

    As you can tell from my blog, I like food photos that show a glimpse of my dishes. Try taking or cropping photos that keep a varying amount of the dish in the frame, and see what you like.

  5. Practice, practice, practice!!

I hope these tips are helpful.

If you'd like to check out food blogs with fantastic photography, visit my two favorites:
Northwest Noshings
The Way the Cookie Crumbles

Monday, July 21, 2008

Rigatoni with Sausage and Parsley

Inspiration:
Everyday Food: Great Food Fast (p. 325)

Ingredients:
  • 1 pound bulk spicy Italian sausage, removed from casings and crumbled
  • 2 medium red onions, halved and sliced 1/4 inch thick
  • 14 ounces chicken broth
  • 1 lb rigatoni
  • 3 cups fresh flat-leaf parsley leaves
  • 1/2 cup grated Parmesan cheese, plus more for garnish
  • coarse salt + fresh ground pepper

Instructions:
  1. In a large nonstick skillet over medium-high heat, cook the sausage until browned, breaking apart any large pieces with a wooden spoon, about 5 minutes. Reduce the heat to medium. Add the onions; cook, stirring occasionally, until the onions are carmelized and the sausage is cooked through, 10 to 12 minutes. Add the broth; cook until heated through, 3 to 5 minutes.
  2. Meanwhile in large pot of boiling salted water, cook the pasta until al dente according to the package instructions. Drain; return to the pot.
  3. Add sausage mixture, parsley, and Parmesan to pasta; toss to combine. Season with salt and pepper.

Notes:
The parsley from my CSA is just delicious! Try to find good-quality flat-leaf parsley for this recipe. Sometimes it's nice to have a pasta without a tomato or cream sauce. This fits the bill.

Liz's Rating: 9/10
Tim's Rating: 8.5/10

Broccoli Cheese Bake

Inspiration:
Broccoli from our CSA and this recipe

Ingredients:
  • 4 cups fresh broccoli
  • 1/4 cup butter
  • 1 tablespoon all-purpose flour
  • 1/2 small onion, chopped
  • 5/8 cup milk
  • salt and pepper to taste
  • 2 cups shredded Swiss cheese
  • 1 egg, beaten

Instructions:
  1. Preheat oven to 325 degrees F (165 degrees C).
  2. Place broccoli in a steamer over 1 inch of boiling water, and cover. Cook until tender but still firm, about 2 to 6 minutes. Drain.
  3. Melt butter in a medium saucepan over medium heat and add flour; cook until bubbly. Stir in onion and gradually add milk, stirring well. Bring to a boil and cook for 1 minute. Remove from heat and season with salt and pepper. Stir in cheese and eggs; mix well. Combine mixture with broccoli and transfer to a small casserole dish.
  4. Bake in preheated oven for 30 minutes.

Notes: Definitely not the healthiest broccoli recipe, but it's pretty tasty!

Liz's Rating: 8/10
Tim's Rating: 9/10 ("Is this quiche?")

Sunday, July 20, 2008

Lemon-Parsley Pork Chops

Inspiration:
Parsley from our CSA and Everyday Food

Ingredients:
  • Zest of 1 lemon
  • 2 tablespoons chopped fresh parsley
  • 1 garlic clove, minced
  • Coarse salt and ground pepper
  • 2 tablespoons olive oil
  • 4 bone-in loin pork chops, (about 8 ounces each)

Instructions:
  1. Mince lemon zest; combine in a small bowl with parsley, garlic, 1/2 teaspoon salt and 1/4 teaspoon pepper. Set aside.
  2. Heat oil in a large skillet over high heat. Season pork chops on both sides with salt and pepper. Cook in skillet until browned, 2 to 3 minutes per side.
  3. Add 1/2 cup water to skillet; bring to a boil. Reduce heat to medium-low; cover, and simmer gently until pork is cooked through, 8 to 10 minutes. Transfer pork chops to a platter or serving plates; drizzle with pan juices as desired, and sprinkle with lemon-parsley mixture.

Notes: This is a yummy, fresh-tasting recipe. It would be perfect for winter when we need some freshness for our taste buds, since quality lemon and parsley are available year-round.


Tim's Rating: 9/10
Liz's Rating: 9.5/10

Beet and Cheddar Risotto

Inspiration:
Beets from our CSA and this Food and Wine recipe.

Ingredients:
  • 1 medium beet, peeled and quartered
  • 2 cups loosely packed beet greens, stems trimmed
  • 2 cups water
  • 2 cups vegetable broth
  • 2 tablespoons extra-virgin olive oil
  • 1 medium onion, minced
  • 1 cup arborio rice
  • 8 ounces shredded sharp cheddar cheese (2 cups)
  • Salt and freshly ground pepper
  • Freshly grated Parmigiano-Reggiano cheese, for serving

Ingredients:
  1. Place the beet in a food processor and pulse until finely chopped. Add the beet greens and pulse until finely chopped.
  2. In a medium saucepan, bring the water and vegetable broth to a simmer. Heat the oil in a large saucepan. Add the onion and cook over moderately high heat, stirring, until softened, 3 minutes. Add the rice and cook, stirring, for 2 minutes. Stir in the beets and beet greens and cook for 1 minute. Add the broth to the large saucepan, 1 cup at a time, and cook over moderate heat, stirring, until the liquid is nearly absorbed between additions, 20 minutes. Add the cheddar; season with salt and pepper. Cook, stirring until the risotto is creamy and thick, 3 minutes longer. Serve in deep bowls, passing the Parmigiano-Reggiano on the side.

Notes: It turned out a little al dente, but I was happy with my first attempt at risotto! I actually thought it tasted better before I added the cheddar, and I am the world's biggest cheese lover. It looked so beautiful! This would be a great side dish for the holidays with its festive appearance.

Tim's Rating: 8/10
Liz's Rating: 8/10

Cucumber Limeade

Inspiration:
A cucumber from our CSA and Everyday Food

Ingredients:
  • 1 English cucumber, (about 1 pound)
  • 1 1/2 cups water
  • 1/4 cup sugar
  • Juice of 1 lime
  • 1/4 teaspoon coarse salt
  • 1 cup ice cubes

Instructions:
  1. Peel English cucumber; remove any seeds. Coarsely chop and combine in a blender with water, sugar, lime juice, coarse salt, and ice cubes; blend until smooth.
  2. Serve over ice, garnished with cucumber spears, if desired.

Notes: The flavor was good. I didn't care for the texture; I don't like smoothies, so it's not too surprising. The flavor combination was good; I will continue to have ice water with cucumber and lime slices!

Tim's Rating: 8/10 ("Not sure about the texture.")
Liz's Rating: 7/10

Friday, July 18, 2008

Tortilla and Black Bean Pie

Inspiration:
Everyday Food

Ingredients:
  • 4 (10-inch) flour tortillas
  • 1 tablespoon canola oil
  • 1 large onion, diced
  • 1 jalapeno chile, minced (remove seeds and ribs for less heat)
  • 2 cloves garlic, minced
  • 1/2 teaspoon ground cumin
  • Coarse salt and ground pepper
  • 2 cans (15 ounces each) black beans, drained and rinsed
  • 12 ounces beer, or 1 1/2 cups water
  • 1 package (10 ounces) frozen corn
  • 4 scallions, thinly sliced, plus more for garnish
  • 2 1/2 cups (8 ounces) shredded cheddar cheese
  • sour cream and salsa, for serving

Instructions:
  1. Preheat oven to 400 degrees. Using a paring knife, trim tortillas to fit a 9-inch springform pan, using the bottom of the pan as a guide. Set aside.
  2. Heat oil in skillet over medium heat. Add onion, jalapeno, garlic, and cumin; season with salt and pepper. Cook, stirring occasionally, until onion is softened, 5 to 7 minutes.
  3. Add beans and beer to skillet, and bring to a boil. Reduce heat to medium; simmer until liquid has almost evaporated, 8 to 10 minutes. Stir in corn and scallions, and remove from heat. Season with salt and pepper.
  4. Fit a trimmed tortilla in bottom of springform pan; layer with 1/4 of the beans and 1/2 cup cheese. Repeat three times, using 1 cup cheese on top layer. Bake until hot and cheese is melted, 20 to 25 minutes. Unmold pie; sprinkle with scallions. To serve, slice into wedges and serve with sour cream and salsa.

Recipe Notes:
"Serve this brightly colored, layered tortilla pie with salsa and sour cream on the side. You can assemble the pie ahead of time, then bake it just before serving."


My Notes:
We loved this, as we pretty do much any recipe with Mexican flavors. This would be a good vegetarian recipe to serve to guests (as long as they love cheese!), although I would have made more effort for it to look pretty. Sorry the photos aren't great; I made it too late to have any natural light. Here is a picture of it once I cut out a slice:

Liz's Rating: 8.5/10
Tim's Rating: 10/10 (He actually flashed me five fingers twice as he was shoveling it in. I said, "Are you rating it a 10?" He said, "Mmmm-Hmmm.")

Gougéres

Inspiration:
A NY Times recipe, adopted from Sara Dickerman and Baking with Julia by Dorie Greenspan

Ingredients:
  • ¾ cup flour
  • ½ teaspoon sugar
  • ½ teaspoon salt
  • 1/8 teaspoon nutmeg
  • pinch cayenne pepper
  • 3 ½ tablespoons unsalted butter
  • ¼ cup whole milk
  • 3 large eggs
  • 5 ounces Gruyère, grated
  • 1 egg, beaten with 1 teaspoon water.
Instructions:
  1. Mix the flour, sugar, salt, nutmeg and cayenne in a small bowl. In a heavy saucepan, melt the butter with the milk and ¼ cup of water over medium heat, stirring constantly with a wooden spoon. Bring to a rolling boil, add the flour mixture and stir briskly for 1 minute. The dough should form into a ball, and a thin film should cover the bottom of the pan.
  2. Immediately transfer the dough to the bowl of an electric mixer fitted with a paddle. Mix on low to quickly release the steam. Just after the steam subsides, add an egg and increase the speed to medium. The dough will break into lumps at first. Once the dough comes back together, add the second egg and continue mixing.
  3. In a small bowl, lightly beat the third egg. Stop the mixer. When the dough is lifted with a spoon, it should detach and form a slowly bending peak. If the dough is too thick and doesn’t bend, mix in half of the beaten egg. Check the dough again; add the remaining beaten egg as needed.
  4. Preheat the oven to 400 degrees. Line two sheet pans with parchment paper.
  5. Fold ¾ of the Gruyère into the warm dough. Pipe or scoop the dough onto the prepared pans in tablespoon-size balls. Using a pastry brush, glaze each ball with the egg wash, smoothing out peaks with gentle pressure on the brush. Top each ball with a pinch of the remaining grated cheese. Bake for 18 minutes, rotating the pans once. The puffs should be light golden brown. Turn off the oven, crack open the oven door and let cool in the oven for at least 10 minutes before serving. Serve immediately.

My Notes:
I had a problem with them falling. When I cracked open the oven door at the end of the recipe, they had all puffed up beautifully. I didn't do anything for those 10 minutes, and then about 80% of them had fallen flat. Any ideas on what I did wrong?
These were so delicious right out of the oven! I took them to book club, and they were just ok when cooled. So I will follow the instructions next time and "serve immediately."


Tim's Rating: 8/10 ("There wasn't much to them.")
Liz's Rating: 9.5/10 when warm, 8/10 when cooled.

Wednesday, July 16, 2008

Lentil-Walnut Burgers with Yogurt Cilantro Sauce

Inspiration:
Everyday Food


Ingredients:

Lentil-Walnut Burgers:
  • 3/4 cup toasted walnuts, cooled
  • 1/3 cup plain dried breadcrumbs
  • 3 garlic cloves, coarsely chopped
  • 2 teaspoons ground cumin
  • 2 teaspoons ground coriander
  • 1/4 to 1/2 teaspoon red-pepper flakes
  • Coarse salt and ground pepper
  • 3/4 cup lentils, cooked, drained, and cooled
  • 4 tablespoons olive oil
  • 1 large egg
  • pita bread

Yogurt-Cilantro Sauce:
  • 3/4 cup plain low-fat yogurt
  • Coarse salt and ground pepper
  • 2 tablespoons chopped fresh cilantro leaves
  • 1 tablespoon fresh lemon juice

Instructions:
  1. In a food processor, combine walnuts, breadcrumbs, garlic, cumin, coriander, pepper flakes, 1 1/2 teaspoons salt, and 1/4 teaspoon pepper; process until finely ground. Add lentils and 1 tablespoon oil; pulse until coarsely chopped (some lentils should remain whole).
  2. In a large bowl, whisk egg. Add lentil mixture; mix well. Divide into 4 equal-size parts; roll into balls, and flatten with the palm of your hand into 3/4-inch-thick patties.
  3. Heat remaining 3 tablespoons oil in a large nonstick skillet. Add burgers; cook over medium-low heat until crisp and browned, turning gently with a thin-edged spatula, 8 to 10 minutes per side. Transfer to a paper-towel-lined plate to drain.
  4. Prepare sauce: in a small bowl, whisk together yogurt, cilantro, and lemon; season with salt and pepper.
  5. Serve lentil-walnut burgers in pita bread; drizzle with sauce.

Nutritional Information (burgers only): Per serving (without sauce): 460 calories; 28.9 grams fat; 18.7 grams protein; 35 grams carbohydrates; 13.6 grams fiber

Notes: This vegetarian meal was delicious, if not low-calorie! We loved it. You must toast the walnuts; it adds so much flavor.

Tim's Rating: 8.5/10
Liz's Rating: 9.5/10

Tuesday, July 15, 2008

Green Curry Chicken with Zucchini

Inspiration:
Quick & Easy Thai

Ingredients:
  • 2 medium zucchini or 2 long purple Asian eggplants
  • 1 1/2 cups unsweetened coconut milk
  • 2 to 3 tablespoons green curry paste
  • 3/4 pound boneless chicken thighs or breast, cut in big, bite-sized pieces
  • 1 1/2 cups chicken broth or water
  • 2 tablespoons fish sauce
  • 1 tablespoon palm sugar or brown sugar
  • 6 to 8 wild lime leaves, torn or cut in half (optional)
  • A handful of fresh Asian or Italian basil leaves, plus basil sprigs for garnish
  • cooked rice


Instructions:
  1. Cut the zucchini in half lengthwise and then crosswise into 1-inch chunks; set aside. In a medium saucepan or heavy skillet, bring 3/4 cup of the coconut milk to a gentle boil over medium-high heat. Cook for 2 to 3 minutes, until it begins to thicken and becomes fragrant. Add the curry paste and cook 2 to 3 minutes, pressing and stirring to dissolve it into the coconut milk. Add the chicken and cook 2 minutes more, tossing to coat it with the sauce.

  2. Add the remaining 3/4 cup coconut milk, the chicken broth, zucchini, fish sauce, palm sugar, and about half the wild lime leaves, if using, and bring to a gentle boil. Reduce heat to maintain a lively simmer and cook, stirring now and then, until the chicken is cooked and the zucchini is tender but still firm, 8 to 10 minutes. Remove from the heat and stir in the remaining lime leaves and the fresh basil leaves. Garnish with a few sprigs of fresh basil and serve hot or warm over rice.


Recipe Notes:
"Green curry gets its name from the profusion of fresh hot green chilies fortifying the curry paste, rather than from the color of the finished curry. Some say it is the hottest of all Thai curries, but curry heat depends both upon how a given curry paste is made, and how much of it the cook stirs into the curry pot. The classic green curry uses chicken with lots of golfball-sized Thai eggplant, known as makeua poh, along with a flourish of the tiny, fragrant eggplant called makeua peuang, which adds a unique herbal note to the curry. I like it with chicken thighs cut into generous chunks and zucchini or yellow squash, or some of both. Long purple Asian eggplant makes a fabulous alternative. The lime leaves and basil are lovely, but not essential to a great green curry."


My Notes:
The sauce was thinner than I would prefer. Next time I wouldn't add the chicken broth until I thought it needed it. I did like the flavor, and I liked the addition of zucchini to pack in veggies.


Tim's Rating: 9/10
Liz's Rating: 8/10

Thai Spinach with Black Pepper and Garlic

Inspiration:
Spinach from our CSA and this recipe.

Ingredients:
  • 2 tablespoons vegetable oil

  • 1 tablespoon coarsely chopped garlic

  • 8 to 10 cups loosely packed fresh spinach leaves (about 20 ounces)

  • 2 tablespoons fish sauce, or 1 teaspoon salt

  • 2 teaspoons sugar

  • 1/2 teaspoon black pepper or white pepper

  • 1/4 cup water


Instructions:
  1. Heat the oil in a large, deep skillet or a wok over medium-high heat for about 1 minute, and then add the garlic. Toss well and add the spinach. Gently turn the pile of spinach to heat most of the leaves. (Add it in 2 or 3 batches if your pan won’t hold all the leaves at first).
  2. Add the fish sauce or salt,the sugar, pepper and water. Toss well, and then cook, turning often, until the spinach is barely wilted and tender, 1 to 2 minutes. Turn out onto a deep platter, sauce and all, and serve hot, warm or at room temperature.

Recipe Notes:
"This is my version of the classic Thai dish,
pahk boong fai daeng, made with pahk boong, a leafy, hollow-stemmed Asian vegetable known as water spinach. In Thailand, pahk boong is fried over such a hot fire that flames leap out of the wok as the chef toss the greens. My home version will give you most of the fantastic flavor without the unwieldy fire, using a sack of prepared spinach from your grocery store produce section. Forget how health-full spinach is for us – make this just because it tastes so good."


My Notes:
The fish sauce was a bit too much. I didn't care for this.

Tim's Rating: 7/10
Liz's Rating: 6/10

Monday, July 14, 2008

Chicken, Rice, and Black-Bean Salad

Inspiration:
I like to take pasta salads to work during the week. I had this recipe from Martha Stewart sitting in my recipe binder and finally got around to making it (with some modifications).


Ingredients:
  • 1 cup brown (or white) rice
  • 3 boneless skinless chicken breasts, cooked with olive oil, kosher salt, Adobo Seasoning from Penzeys, cooled and diced
  • 1 can (15 1/2 ounces) black beans, drained and rinsed
  • 2-4 on-the-vine tomatoes, seeded and diced
  • 3-4 scallions and 1 garlic scape (optional), thinly sliced
  • 1 jalapeno chile (seeds and ribs removed for less heat, if desired), minced
  • 1/4 cup white-wine vinegar
  • 3 tablespoons olive oil
  • 1/2 teaspoon ground cumin
  • Coarse salt and ground pepper

Instructions:
  1. Cook rice according to package instructions. Spread on a baking sheet; refrigerate until cool.
  2. Place cooled rice in a large bowl; add chicken, beans, tomatoes, scallions, jalapeno, vinegar, oil, and cumin. Season with salt and pepper; toss to combine. Serve immediately, or refrigerate, covered, up to 1 day.

Recipe Notes: To make a Southwestern-style salad that's a meal in itself, toss together chicken, rice, beans, and tomatoes with a light, spicy dressing. Serves 4.

My Notes: I loved this recipe--what a great summer dish! I love the flavors, and it has a nice kick. If you don't like spicy food, cut back or eliminate the jalepeño. I absolutely love the Adobo Seasoning from Penzeys and highly recommend it. Although this isn't really a Mexican recipe, I am tagging it as such due to its flavor profile. I am already looking forward to tomorrow's lunch.


Liz's Rating: 10/10
Tim's Rating: 9.5/10

Sunday, July 6, 2008

Chicken-Gorgonzola Pasta Salad

Inspiration:
My desire to recreate the pasta salad from D'Amico and Sons and this recipe.

Ingredients:
  • 1 lb. uncooked gobbetti or radiatore pasta
  • 4 cubed cooked chicken breasts
  • 1lb bacon, cooked and crumbled
  • 4 diced roma tomatoes
  • 2 cups fresh baby spinach leaves, lightly packed
  • 1 cup ranch dressing (more to taste)
  • 1 cup gorgonzola, crumbled (4 oz)

Instructions:
  1. Cook and drain pasta as directed on package.
  2. In a large bowl, mix cooked pasta, chicken, bacon, tomatoes and spinach.
  3. Pour dressing over pasta mixture, toss until coated.
  4. Fold in cheese.
  5. Cover and refrigerate until serving.

Liz's Rating: 9/10

Garlic Scape Pesto

Inspiration:
Garlic scapes from our CSA and this recipe.

Ingredients:
  • 1/2 cup garlic scapes (about 4 scapes), top flowery part removed, cut into ¼-inch slices
  • scant 1/4 cup walnuts
  • 1/4 cup olive oil
  • ¼ cup grated parmigiano
  • 1/4 teaspoon salt
  • black pepper to taste

Instructions:
  1. Place scapes and walnuts in the bowl of a food processor and whiz until well combined and somewhat smooth. Slowly drizzle in oil and process until integrated.
  2. With a rubber spatula, scoop pesto out of bowl and into a mixing bowl. Add parmigiano to taste; add salt and pepper.

Recipe Notes:
"Makes about 6 ounces of pesto. Keeps for up to one week in an air-tight container in the refrigerator.
For ½ pound short pasta such as penne, add about 2 tablespoons of pesto to cooked pasta and stir until pasta is well coated."

Notes:
Tim doesn't like pesto, but I have been craving it. When we got a recipe in our CSA box this week, I knew it was pesto time. I topped buttery crackers with locally-produced cream cheese and a bit of pesto on top. So. Good.

Liz's Rating: 8.5/10
Tim's Rating: n/a (not a fan of pesto)

Ranch Dressing

Inspiration:
An increasing dislike for bottled salad dressings and this recipe.

Ingredients:
  • 1 cup mayonnaise
  • 1/2 cup sour cream
  • 1/2 teaspoon dried chives
  • 1/2 teaspoon dried parsley
  • 1/2 teaspoon dried dill weed
  • 1/4 teaspoon garlic powder
  • 1/4 teaspoon onion powder
  • 1/8 teaspoon salt
  • 1/8 teaspoon ground black pepper

Instructions:
  1. In a large bowl, whisk together the mayonnaise, sour cream, chives, parsley, dill, garlic powder, onion powder, salt and pepper.
  2. Cover and refrigerate for 30 minutes before serving.

Notes:
Perfect flavor!
It's a little thick for salad dressing, so you may want to thin it out with some buttermilk.

Liz's Rating: 10/10
Tim's Rating: 9/10

Amber's "Hungry Man" Enchiladas

Inspiration:
Amber's Delectable Delights

Ingredients for Chili Gravy:
  • 1/4 cup canola oil
  • 1/4 cup flour
  • 1/2 tsp black pepper
  • 1/2 tsp salt
  • 1-1/2 tsp powdered garlic
  • 2 tsp ground cumin
  • 1/2 tsp dried oregano
  • 2 T chile powder
  • 1 pinch ground cayenne pepper
  • 1 pinch red pepper flakes
  • 2 cups chicken broth (or water)

Instructions for Chili Gravy:
  1. Heat the oil in a skillet over medium-high heat.
  2. Stir in the flour and continue stirring for 3 to 4 minutes, or until it makes a light brown roux.
  3. Add all the dry ingredients and continue to cook for 1 minute, constantly stirring and blending ingredients.
  4. Add chicken broth or water, mixing and stirring until the sauce thickens.5. Turn heat to low and let sauce simmer for 15 minutes. If desired, add water to adjust the thickness.

Ingredients for Burritos:
  • 1.5 cups chili gravy, divided, recipe above
  • 6, 8" flour tortillas
  • 2 chicken breasts, cooked and shredded
  • 1 can black beans, rinsed and drained and slightly smashed with a fork
  • 2 cups shredded Mexican Blend cheese, divided
  • 1/4 cup sour cream

Instructions for Burritos:
  1. Preheat oven to 350 degrees.
  2. Line bottom of 9 x 13 pan with 1/2 cup chili gravy.
  3. In a medium bowl mix shredded chicken, beans, 1 cup cheese, and sour cream.
  4. Lay out one tortilla and place 1/2 cup of filling mixture down the center. Fold up tortilla tucking in the ends and rolling into a cylinder. Place enchilada into pan, seam side down, and repeat process until all the filling mixture is gone.
  5. Top enchiladas with remaining 1 cup of chili gravy and 1 cup cheese. Cover the pan with foil and bake at 350 for 25 minutes. Remove foil and bake 5 additional minutes. Serve with a dollop of sour cream.

Amber's Recipe Notes:
"My secret for making flour tortillas pliable and easy to fold is to turn on a burner on the gas stove on and flop the tortilla over it. Let it set for about 15 seconds and then flip it over and let the other side warm for 15 seconds. Please remember that you are dealing with flames here so if your tortilla starts to smoke or catches on fire turn off the burner and remove the tortilla."

My Notes:
Very good! Next time I will make these with corn tortillas. I asked Tim if he wanted flour or corn, and he said flour. Next time I just won't ask. :)
I know my photo looks like a cheesy, gooey mess. If you want better photos, click on the link to Amber's blog at the top of the page! Thanks, Amber!

Liz's Rating: 9/10
Tim's Rating: 9/10 ("Are there beans in this? I like that.")

Saturday, July 5, 2008

Chili-Garlic Roasted Broccoli

Inspiration:
Rachael Ray

Ingredients:
  • 1/4 cup extra virgin olive oil, eyeball it
  • 5 to 6 cloves garlic, finely chopped
  • 1 tablespoon chili powder
  • 1 tablespoon grill seasoning blend (recommended:Montreal Steak Seasoning by McCormick Grill Mates)
  • 1 large head broccoli, cut into thin, long spears

Instructions:
  1. Preheat oven to 425 degrees F.
  2. Place extra-virgin olive oil, garlic, chili powder and grill seasoning in the bottom of a large bowl and add the broccoli spears. Toss to coat broccoli evenly then transfer to a large nonstick baking sheet. Roast the broccoli until ends are crisp and brown and stalks are tender, 17 to 20 minutes.


Notes: This was WAY too salty. Almost inedible. Next time I will try the same flavors but skip the Montreal Steak Seasoning and just use a little kosher salt and pepper. A little lemon juice squeezed on after roasting may be good, too.

Liz's Rating: 5/10
Tim's Rating: n/a (didn't try)

Chickpea Patties

Inspiration:
What did you eat?

Ingredients:
  • 1 15 ounce can of chickpeas, drained and rinsed well.
  • 1/2 cup finely diced onions
  • 1/2 cup finely chopped carrots
  • 1 garlic clove, minced
  • 1/2 cup frozen or fresh green peas
  • 1/2 heaping cup chopped cilantro
  • 1 teaspoon cumin (or more or less)
  • 1 Tablespoon olive oil
  • 1 egg
  • about 1/2 teaspoon salt (check to see if you need more before you add the egg)

Instructions:
  1. Heat the oil in a small skillet and sauté the onions, garlic, and carrots until they are soft. Add the peas when the onions are almost done. Salt them to taste. Add the cumin and cook one minute more.
  2. Put the chickpeas, into a food processor and chop until they are a rough texture. Combine the chickpeas and onion mixture in a bowl, add salt and pepper to taste. Add the egg and cilantro and mix together until fully incorporated.
  3. Heat a non-stick skillet with a thin film of oil until hot. Wet your hands and scoop up handfuls of the mixture. (Smaller patties are easier to cook), and flatten them into patties . Slip them gently into the skillet. If they break apart, just use a spatula to push them into shape. Press down gently with spatula to compress the patty. Cook over a medium high heat for about 4 minutes, then slip a spatula under the bottom to see if they are set enough to lift up. If they are, lift and look at the bottom. If they have browned some, gently flip them over and cook that side for 4 or however many minutes until they are done. If they beak a little when you flip them--just push them together and press down and cook them until they are browned. Serve with the dried cherry and tomato jam.

Notes: As noted in the original recipe, these patties fall apart easily. Suggestions? Another binder, like flour, or an additional egg? The original recipe paired these with a tomato-dried cherry jam; I suggest trying that or a basic tomato sauce. A little sriracha would be good, too.

Liz's Rating: 8/10
Tim's Rating: 9/10

Glazed Turnips

Inspiration:
Turnips and scallions from our CSA and this recipe.

Ingredients:
  • 1/2 stick (1/4 cup) unsalted butter
  • 3 lb turnips, peeled and cut into 1-inch-thick wedges
  • 21/2 cups low-sodium chicken broth
  • 2 teaspoons sugar
  • 1/4 teaspoon salt
  • 2 scallions, finely chopped
  • 2 tablespoons finely chopped fresh flat-leaf parsley

Instructions:
  1. Melt butter in a wide 5-quart heavy pot over moderate heat, then add turnips, stirring until well coated. Add broth, sugar, and salt and bring to a boil, then reduce heat and simmer, covered, until turnips are just tender, 25 to 30 minutes.
  2. Continue to boil turnips, uncovered, stirring occasionally, until liquid is reduced enough to just glaze turnips, about 15 minutes. Sprinkle with scallions and parsley.


Liz's Rating: 8/10
Tim's Rating: 8/10

Strawberry Oat Muffins

Inspiration:
Strawberries from our CSA and this recipe.

Ingredients:
  • 1 cup rolled oats
  • 1 cup buttermilk
  • 1 cup all-purpose flour
  • 1 teaspoon baking powder
  • 1/2 teaspoon baking soda
  • 1 teaspoon salt
  • 1 egg
  • 1/4 cup vegetable oil
  • 3/4 cup brown sugar
  • 1 teaspoon vanilla
  • 1 cup chopped fresh strawberries

Instructions:
  1. Preheat oven to 375 degrees F (190 degrees C). Grease and flour a muffin pan, or use paper liners. In a small bowl, combine oats and buttermilk, and let stand 5 minutes. In a medium bowl, combine flour, baking powder, baking soda and salt; set aside.
  2. In a large bowl, beat together the egg, oil, brown sugar and vanilla. Blend in the oat mixture. Stir in the flour mixture, just until moistened. Fold in strawberries. Fill muffin cups 2/3 to 3/4 full.
  3. Bake in the preheated oven for 15 to 20 minutes, or until a toothpick inserted into the center comes out clean.

Notes: I don't know if I would make these again. They taste good but don't have the "wow" factor of Katie's strawberry cupcakes. If you do try these, use paper liners as these muffins fell apart pretty easily.

Liz's Rating: 8/10

Thursday, July 3, 2008

French Quarter Potatoes with Andouille

Inspiration:
A Williams-Sonoma recipe featured on the blog What Did you Eat?

Ingredients:
  • 2 Tablespoons Creole or stone ground mustard
  • 1 Tablespoon Worcestershire sauce
  • 1/8 teaspoon cayenne pepper (more if you like spice)
  • 1/8 teaspoons ground Allspice
  • 3 Tablespoons olive oil
  • 1 1/4 lb (625 g) small red or white potatoes, cut into 1/2 inch cubes
  • 4 bay leaves
  • freshly ground black pepper
  • 6 large cloves garlic
  • 1 1/2 cups chopped red onions
  • 4 andouille sausage links. quartered lengthwise and then cut crosswise into 1/2 inch chunks
  • 2 green onions, pale and green parts, chopped


Instructions:
  1. In a small bowl, combine the mustard Worcestershire sauce, cayenne, and allspice. Set aside
  2. Heat olive oil in a heavy nonstick skillet and cook the potatoes, bay leaves and 1/4 teaspoon black pepper over medium heat for about 15 minutes or until potatoes are tender. Cover the pan as they cook. When potatoes are tender, add the garlic, and onions and raise the heat to high and cook for about 6 minutes, stirring frequently. Then add the sausage and stir until heated through. Stir in the mustard mixture, then serve, topping with green onions.

Notes:
We both loved this. Keep in mind we're both from Wisconsin, of German descent (Tim more than me), and love sausage and potatoes.
The original recipe calls for green bell pepper, but I omitted since we don't care for it.
This is a very tasty recipe. It's probably more of a winter recipe than summer, but I had andouille I needed to use up!


Liz's Rating: 9/10
Tim's Rating: 10/10
("One of the best things I've ever tasted.")

Honey-Pecan Crusted Chicken Tenders

Inspiration:
A Cooking Light recipe featured on the blog Pleasure Cooker

Ingredients:
  • salt and pepper
  • boneless, skinless chicken tenders
  • 1/4 cup honey
  • 2 tbsp Dijon mustard
  • 3/4 tsp paprika
  • 1/8 tsp garlic powder
  • 1 1/4 cups finely crushed cornflakes
  • 1/2 cup finely chopped pecans
  • canola oil

Instructions:
  1. Preheat oven to 400.
  2. Sprinkle salt and pepper over chicken.
  3. Combine honey, mustard, paprika and garlic in a small bowl.
  4. Combine cornflakes and pecans in a shallow dish (I crushed up the cornflakes and pecans together in my mini food processor). Brush both sides of chicken with honey mixture; dredge in cornflake mixture.
  5. Place chicken on a baking sheet lined with parchment paper. Lightly coat the chicken with canola oil, applied with a pastry brush.
  6. Cook at 400 for 15 minutes or until done.

Notes:
The original recipe uses cooking spray, but I don't, so I replaced it with canola oil.
This was very good! I am going to be making it again soon. It was very easy.

Tim's Rating: 9/10
("Tastes like McDonald's chicken nuggets dipped in honey!")
Apparently a good thing?
Liz's Rating: 9/10

Tuesday, July 1, 2008

Fettucine with Bacon, Tomatoes, Arugula (with or without Goat Cheese)

Inspiration:
Arugula and green onions from our CSA
Modified from this recipe from Bon Appétit

Ingredients:
  • 1 28-oz can diced tomatoes, drained well
  • 2 tablespoons balsamic vinegar
  • 3 tablespoons olive oil
  • 4 thick bacon slices, cut into 1/2-inch pieces
  • 4-6 medium scallions (white and pale green parts only), finely chopped
  • 2 tablespoons finely chopped garlic
  • 1 tablespoon chopped fresh rosemary
  • 1/2 teaspoon dried crushed red pepper
  • 3-5 cups coarsely chopped fresh arugula
  • 1 9-ounce package fresh fettuccine
  • 3-6 ounces soft fresh goat cheese , crumbled
  • 6 tablespoons freshly grated Parmesan cheese
  • additional grated Parmesan cheese

Instructions:
  1. Combine well-drained tomatoes and vinegar in large bowl. Season with salt and pepper and set aside.
  2. Heat oil in heavy large skillet over medium-high heat. Add bacon; cook until crisp, about 5 minutes. Using slotted spoon, transfer bacon to paper towels.
  3. Add scallions, garlic, rosemary and crushed red pepper to skillet; sauté 1 minute. Add tomato mixture and cooked bacon. Simmer until tomatoes are heated through, about 4 minutes. Add arugula and simmer until wilted, about 1 minute.
  4. Meanwhile, cook pasta in large pot of boiling salted water until tender but still firm to bite, about 3 minutes. Drain.
  5. Transfer pasta to large bowl. Add goat cheese, 6 tablespoons Parmesan cheese and tomato mixture. Toss to combine. Season with salt and pepper. Serve, passing additional Parmesan separately.

Notes:
  • This makes a lot of sauce. We like a lot of sauce with our pasta; if you don't, I would add another package of fettucine.
  • The original recipe uses fresh tomatoes. I used canned, because tomatoes still aren't in season here, and I had a lot of cans of diced tomatoes in the pantry. I would suggest using fresh tomatoes in this recipe, and I likely will next time.
  • Tim doesn't care for goat cheese, so I just added it to mine! His loss!

Liz's Rating: 8/10

Easy Ham and Spinach Quiche

Inspiration:
allrecipes.com

Ingredients:
  • 2 cups milk
  • 4 eggs
  • 3/4 cup biscuit baking mix
  • 1/4 cup butter, softened
  • 1/4 teaspoon cayenne pepper
  • 1 large bunch spinach, washed, stemmed, cooked, and chopped
  • 1 cup cubed cooked ham
  • 8 ounces shredded Cheddar or Swiss cheese

Instructions:
  1. Preheat oven to 375 degrees F (190 degrees C). Lightly grease am 8 x 11 glass baking dish.
  2. In a large bowl, beat together milk, eggs, baking mix, butter and cayenne. Batter will be lumpy. Stir in spinach, ham and cheese. Pour into prepared dish.
  3. Bake in preheated oven for 50 minutes, until eggs are set and top is golden brown.

Notes:
The eggs got a bit brown, but it tastes great!

Tim's Rating: 8.5/10
Liz's Rating: 8.5/10

Lemon-Blueberry Muffins

Source:
Food and Wine

Ingredients:
  • 1 3/4 cups all-purpose flour
  • 3/4 cup plus 2 tablespoons sugar
  • 2 teaspoons baking powder
  • 3/4 teaspoon salt
  • 1 cup blueberries
  • 2 large eggs
  • 1/2 cup milk
  • 1/4 cup vegetable oil
  • Finely grated zest of 1 lemon
  • 1/4 cup fresh lemon juice

Instructions:
  1. Preheat the oven to 375°. Butter a standard 12-cup muffin pan. In a medium bowl, whisk the flour with the sugar, baking powder and salt. Stir in the blueberries. In another medium bowl, whisk the eggs with the milk, oil and lemon zest, then whisk in the lemon juice. Using a rubber spatula, fold the egg mixture into the flour mixture until blended; do not overmix.
  2. Spoon the batter into the muffin cups and bake for about 20 minutes, or until a cake tester inserted in the center of a muffin comes out clean. Let the muffins stand in the pan for 5 minutes, then carefully transfer them to a rack to cool slightly. Serve warm or at room temperature.

Recipe Notes:
"Using frozen berries makes the batter incredibly thick and keeps them from sinking to the bottom of the pan. Of course, the muffins are fantastic with fresh blueberries as well.
Once thoroughly cooled, the muffins can be kept overnight in an airtight container."

My Notes:
Next time I will sprinkle a little sugar on top before baking. These are very, very good.

Tim: 9/10
Liz's Rating: 9.5/10